Posts

Swiss Meringue Buttercream

Image
For years I have been avoiding the cult of meringue buttercream.  I've done this mainly because it just seemed to hard to be bothered.  I tried French buttercream years ago, and I found while I could make it on my old Sunbeam Mixmaster, it just never worked on my Kitchenaid. But I have been watching my old school friend, Gail Turner, using Swiss Meringue Buttercream on many of her creations, and I thought, if Gail can do it, so can I.  I humbly asked for her recipe and she shared it with me.  Being ever the adventurer, I thought I'd use it for the very first time on my best friend's wedding cake - because living dangerously is fun! The process of making the meringue buttercream was relatively easy, although there is a point where you think it's gone horribly wrong.  Look away at that point, and by the time you turn your head back, a miracle will have happened! Ingredients 300g egg whites 375g caster sugar 675g unsalted butter (room temperature) 1 tsp vani

Planet Cake

Image
When my son requested a space party for his birthday this year, I rubbed my hands together with glee - finally I had an excuse to buy some cool tools from the Evil Cake Genius .  My grand idea for a cake was something that looked like Jupiter. I had seen a hand painted one on Pinterest, and I wondered whether I could create a similar effect with swirling fondant.  So I ordered the hemisphere baking tin and spherical cake combs and waited with baited breath until they arrived. You have got to love a fellow cake baker who shares their secrets with you - the Evil Cake Genius sent extensive instructions on how to create a flawless sphere. I was saddened to discover the bottom of her sphere is made from rice crispy treat. Straight away I knew I was going to be one of those smarty pants cooks who deviates from the well trodden path.  The instructions said to fill the tin to almost full to ensure you get a complete hemisphere. My first attempt was too short. I had to bake a

Drip Cake - the low down on the learn!

Image
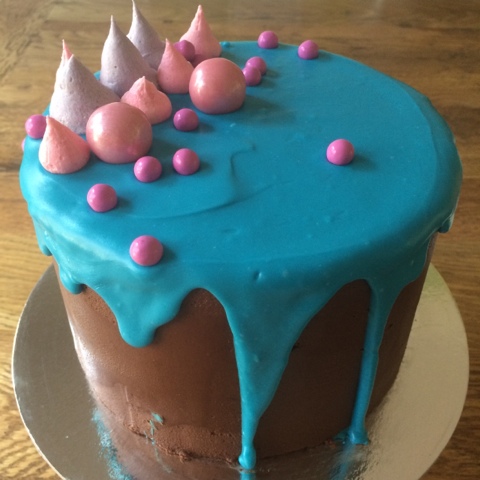
If you love cake as much as I do, you were probably astounded by the mergence of Katheryn Sabbath's drip cakes last year. Her use of candy colours combined with common candy decorations are a visual feast that has sent cake aficionados wild all over the world.  I thought I'd have a go at creating a drip cake myself, after seeing a tutorial this week that uses watered down candy melts for the drip component.  I had three seven inch vanilla buttercakes in the freezer. I set out to build a mega tower, which would let me take my 30cm Perspex scraper out for a spin. As I built the layers I quickly realised I'd end up with a cake so high, it wouldn't fit in my fridge and I would have trouble getting someone to eat it. So I went for three layers of two centimetres each.  I painted each layer with raspberry jam, then scattered a few frozen raspberries across each. Then I spread 3/4 cup of what I'm calling royal buttercream - royal icing made from meringue powder with 500g o

Royal icing for sugar cookies Pt2

Image
Okay, so you've got your cookies, you've got your flood icing. Now what? It's time to choose your colours and fill your piping bags. There really is only one brand of food colour that is used in royal icing. Americolor seems to be the only product that doesn't alter the very delicate liquid balance you've just spent about 15mins adjusting. Trust me, I've tried other brands - liquid colour, gel colour - they just don't produce the same result.  So choose your colours and decant about 200ml of icing into three small mixing bowls. I use ramekins. Add a few drops of colour to each bowl, reserve the icing left in the main bowl for your white supply. I try to stick to four colours per cookie project including white. But there's nothing to stop you from doing more if you have the inclination.  Use a long handled teaspoon to mix the colour through the flood icing, ensuring every last scrap of white is combined. Americolour will dry darker, so wit

Royal icing for sugar cookies Pt1

Image
If you read my sugar cookies post earlier this week, you're probably waiting with baited breath for the icing recipe. The good news is resting your cookies for one or two days is really good for laying down icing. It gives the butter a chance to drop and reduces the risk of grease absorbing into your icing and discolouring the final finish.  As I mentioned, I am a student of Belleissimo Cookies, so all credit goes to Belle for what I've learned. And Belle will tell you her knowledge is garnered from many masters around the world. There are so many great cookie artists willing to share their knowledge and I have benefitted enormously from their generosity.  You will be shocked, no doubt, when I tell you my royal icing is made out of Pavlova Magic! This is an Australian product based on meringue powder. In other countries meringue powder is easy to get in quantities. Not so much here. So Pavlova Magic is the secret ingredient. Now you know! Ingredients 2/3 cup warm water 1 Pavlov

Sugar cookies

Image
In the past two years I've had the great fortune to make friends with Belle Harris of Belleisimo Cookies . Every year in October I shut down cake production because of the hot, humid weather. I don't have aircon in my home and I can't stand the added stress of cake designing  in the heat. So Belle suggested I give cookies a go.  Sugar cookies are a whole other art form to sugar craft with fondant. The cookie dough is a soft eating cookie, and you need to go to great lengths to keep your cookie in it's shape and level on the top. Sugar cookies take ages to make because the icing needs eight to 12 hours to dry. I've achieved a level of competence in my cookies, but Belle is at mastery level. You can check some of her cookie instructional a on youtube.  Meanwhile, here is my sugar cookie recipe, which I've adjusted to suit my style.  250g butter 200g pure icing sugar 1 tsp vanilla bean paste 1 medium egg 425g plain flour  1. Beat the butter and sugar until it

Sharp edges on big cakes

Image
   So what have I been doing all this time?  Deepening my big cake skills mostly.  I found an amazing cake designer named Jessica Harris, who was an interior designer in a former life. She has an amazing eye for geometric design. I took her Craftsy class, Clean & Simple Design, in which Jessica teaches some of her most popular designs. But she also teaches her technique for getting the sharp edge on a fondant cake. Would you believe she turns her cakes upside down?  It's not for the feint hearted. Ganache must have been set for a day to attempt this technique. But it works! As you can see from this bee themed cake. So what's the trick? You prepare you ganache layer as normal, making sure you get the top level and the edges sharp. Here's what mine looks like when I'm satisfied with the finish.  I roll out the fondant and apply it in the same way as usual. I still panic every time I do this. You'd think I'd be over that by now as every job always wo

Tiramisu

Image
The word “tiramisu” literally translates as “pick me up”. This layered dessert probably earned it’s name because of the delicious coffee syrup soaked sponge that make up its base. It is believed tiramisu originates from Tuscany, which is famous for other layered cakes, however, it doesn’t appear to be a very old recipe. Tiramisu often includes a liqueur in the coffee syrup, which is why many people regard it as the Italian equivalent to trifle. The best tiramisus leak coffee syrup onto your plate, and always taste better the day after they are made. I came up with this recipe a few years ago when I was commissioned to write a children's international cookbook. Sadly, the book never eventuated, but this recipe has become legend in my house, with even my non-dessert eating husband slurping it up! 3 egg yolks ¼ cup caster sugar 1 tblsp corn flour 1 tsp vanilla extract 250ml milk 500ml marscarpone cheese 2 tblsp instant coffee powder 2 tblsp sugar 500ml boiling water 1

Where is the Kitchen Alchemist?

Image
Long time no blog, right? I haven't been doing nothing though! Like most bloggers, I gave up on the big stories and went for micro blogging sites like Facebook and Twitter. I have been keeping the world up to date over there. Not so much here. I have been churning out big cake after big cake. I've also taught myself how to make sugar cookies. I'll taking a moment over coming weeks to put some new posts up. Cooking wise, when you have a kid there's a whole lots less fun cooking, I can tell ya! But there have been a few inventions. I'll share those too.